Get Started With Brixly
Welcome to the quick guide showing you how easy it is to set up your Reseller Account with Brixly.
*Please note this process works for all our Reseller products
Step 1 – Getting Started
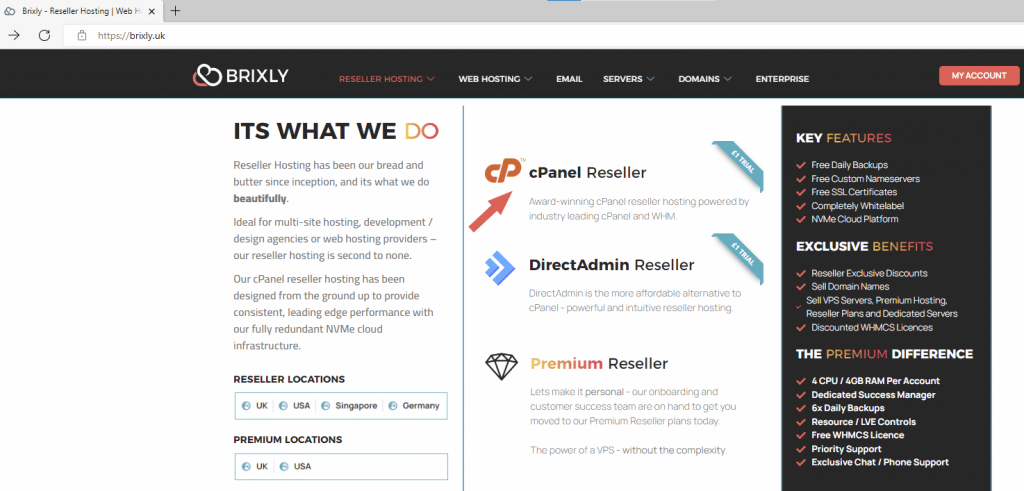
On the Brixly Website, you need to find the package you want. For this example, we will sign up for the cPanel Reseller Entry plan. Because it’s a reseller plan, you must go to the ‘Reseller Hosting‘ tab on the main menu.

Step 2 – Select Package
You have three choices from the ‘Reseller Hosting” tab. We will be signing up for a “cPanel Reseller” hosting package.
Step 3 – Choosing plan
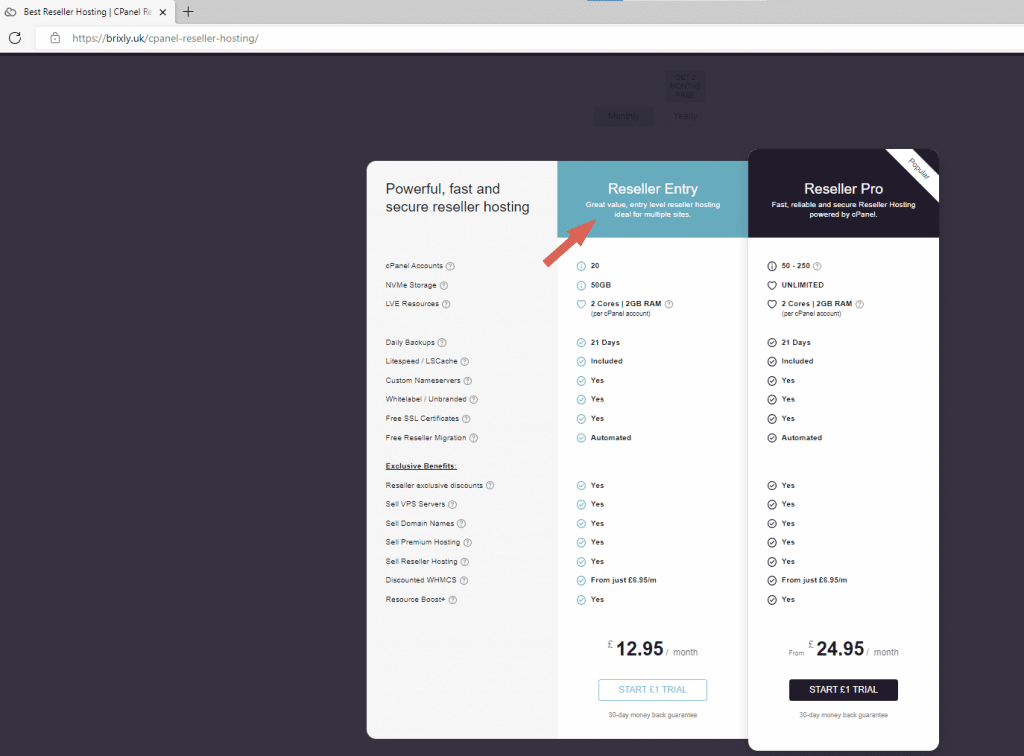
Now we’re on the “cPanel Reseller” Hosting page. You can choose a package that meets your requirements.
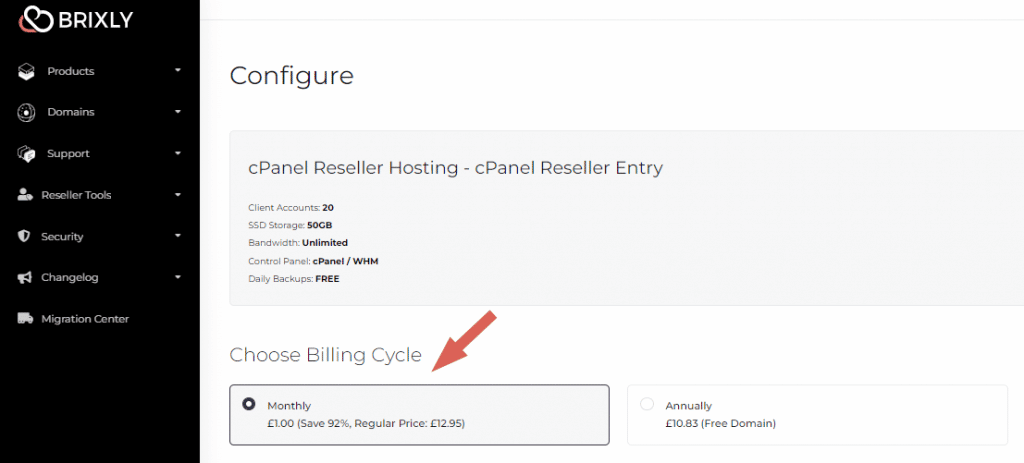
We’re going for the “Reseller Entry” plan, priced at £12.95 per month. The package can be purchased for £1, for the trial month. When paid annually, it is priced at £129.95, but you get two months off and a free domain.
Step 4 – Domain set-up
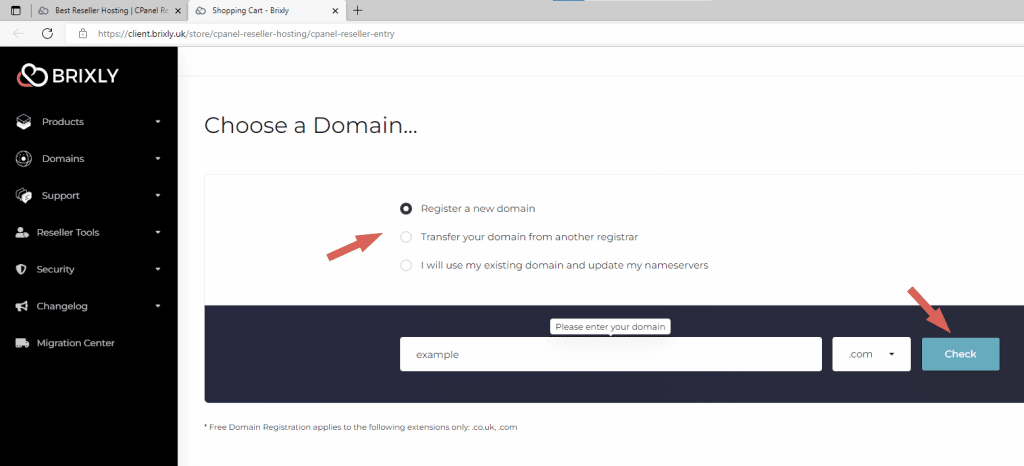
If you want to register a new domain, ensure that option is selected, enter the domain you wish to below and click on the check button to see if it is available. You can also transfer your domain to us by choosing the ‘Transfer your domain from another registrar. However, if you already own a domain with another registrar or us, the option for you would be the last one, ‘I will use my existing domain and update my nameservers’. After updating nameservers, please remember there is a propagation period, which can take up to 48. From experience, your domain will be propagated in less than an hour. If you need information on our nameserver, click here.
*Don’t forget Free domain registrations only apply to .co.uk and .com TLDs.
Step 5 – Configuration
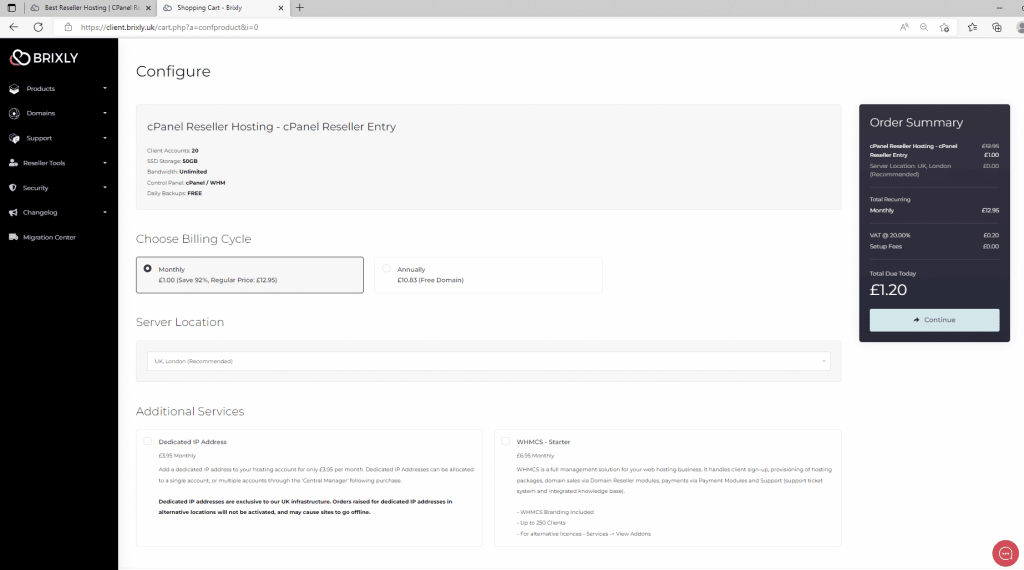
Once the domain is sorted, you can configure your billing cycle, server location and add additional services to your package.
Billing Cycle
You can choose to pay monthly or annually. The monthly plan for the “Reseller entry” is priced at £12.95, with the first month of the plan costing you just £1. The annual plan would cost roughly £10.83 per month, essentially getting you two months of hosting free, and you would also get a Free domain.
Server Location
At Brixly, we have infrastructures in the UK (London), USA (Florida), Germany (Falkenstein) and Singapore, so you are spoilt for choice. Choose the server location nearest to you, be better latency. We do recommend that you use our UK infrastructure as we have direct control and B cloud functionalities. For this example, we are going to use the UK server location.

Additional Services
In the ‘Additional Services’ section, you can choose whether you want to purchase a Dedicated IP Address (UK servers only). You can grab yourself a bargain by adding the WHMCS – Starter license for a fraction of the normal price. Get more WHMCS information.
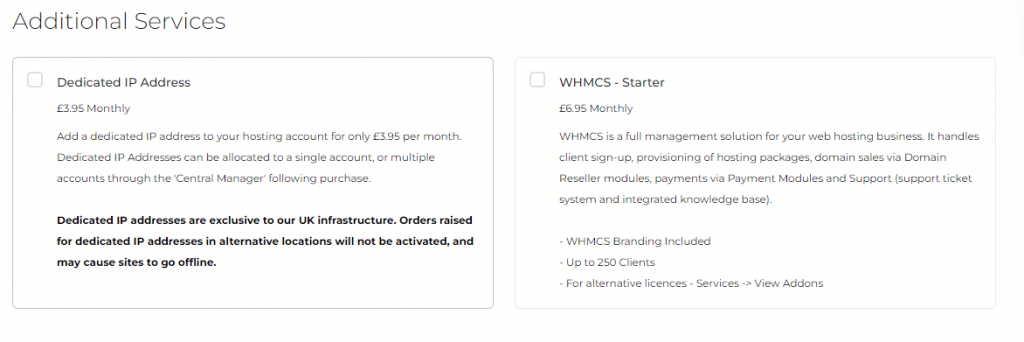
In our case, we’re including the WHMCS License in the purchase, priced at £6.95.

Pricing
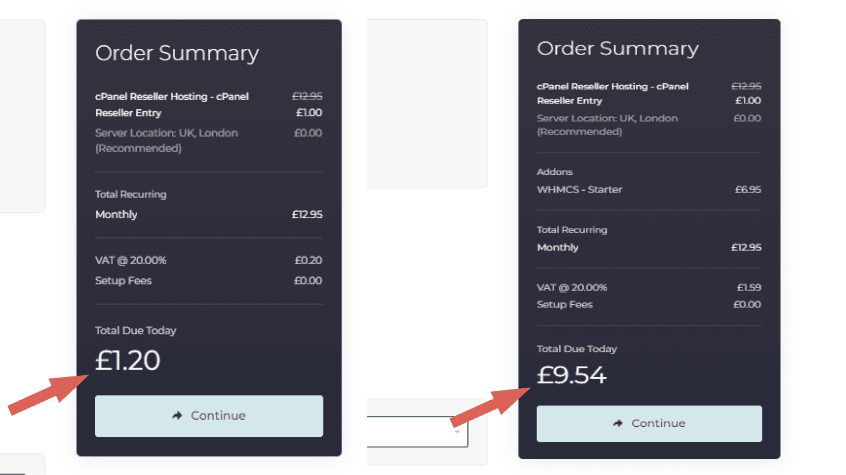
This is the pricing without a WHMCS license next to the pricing with a WHMCS license. When all options are configured, click the ‘Continue’ button at the bottom of the ‘Order Summary’.
Step 6 – Review & Checkout
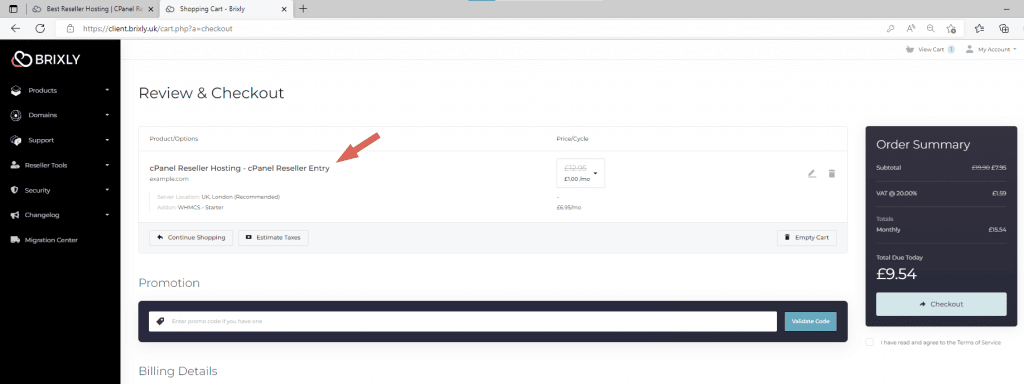
Continuation from the configuration page will take you to the Review & Checkout page. Double-check your order to ensure everything is correct before proceeding with your checkout.
Promotions
If you have a discount Promo code, enter the code in the ‘Promotion’ section and click ‘Validate Code’. The discount will be automatically applied to your ‘Order Summary’ balance if the code is valid.

Step 7 – Account set-up
If you have an existing account with us, then enter your details in the ‘Existing Customer Login’ section, or you could use social platforms to log in. We recommend Facebook or Google.

Creating a New Account
If you don’t have an existing account with us, you can create one by clicking on the ‘Create a New Account’ section and filling in the required details. You can also use Facebook or Google to sign up with us.

Creating a password
For your account security, you must create a password and add a security question that relates to you from the drop-down menu. Please note these are required fields, so you have to enter the details to proceed.

Password Generator
We recommend that you generate a password to get the most robust password for your business. Our password generator allows you to create strong, random passwords with one click to boost your online security. You have the option to choose how many characters you want your password to have, and in the ‘Password Length’ section, You can generate as many passwords as you wish. After you’ve generated a password, you should ‘Copy to clipboard and Insert’.

Payment Methods
After setting up your account, you need to set up your preferred ‘Payment Method’ from our options. Currently, we accept ‘Credit/Debit Card’ payments through ‘Stripe‘. We also accept ‘Direct Debit‘ payments. However, this option only applies to our UK-based client. We accept PayPal payments too!

TOS and Checkout
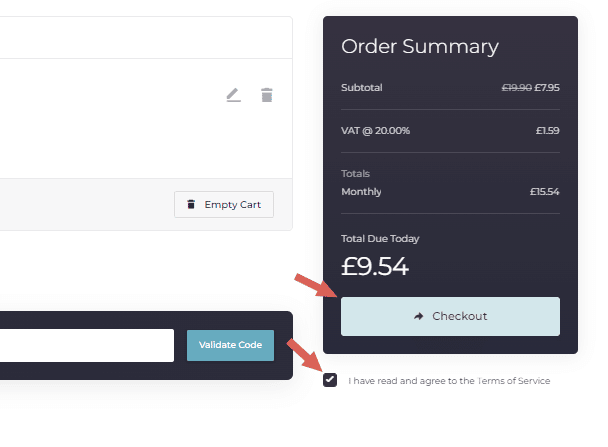
Reading and accepting our terms of service is a requirement before proceeding with the checkout. Ensure the box below the order summary is ticked.
Step 8 – Email confirmation
After checking out, you have completed the purchase process. You should now check your emails for your ‘New Account Information’. Because we signed up for the ‘cPanel Reseller’ with the WHMCS starter license, we have received an additional email ‘WHMCS License Key Provisioned‘, containing the WHMCS information.

Step 9 – Service Active
Dashboard
This is the dashboard area for your account. You can see all your active products/services, domains, support tickets and unpaid invoices. You also have access to shortcuts and other menu items such as the Migration Center.

Support
If you ever need to contact us, we are available 24/7, 7 days a week. You should ‘Open a Ticket’ by going to the top right section. Our team aims to respond within 15 minutes of you submitting it.

Products and Services
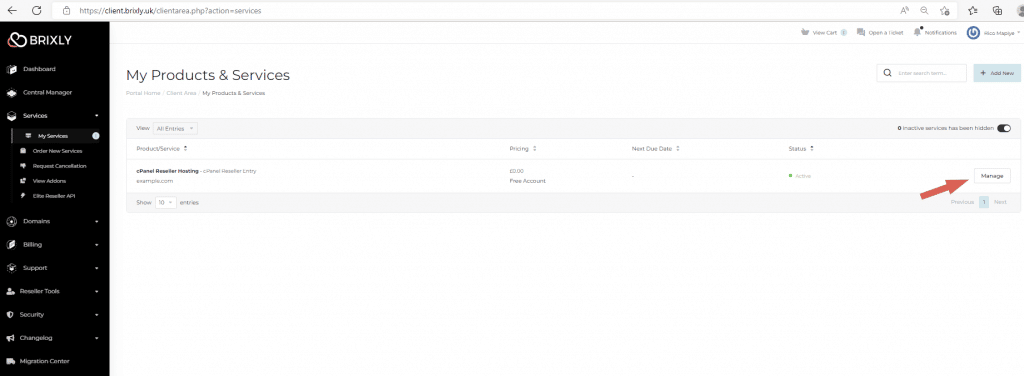
You will find all your products and services in this section. You should click on the manage button next to each service if you need to manage your products and services.
Product Details
This is where you’ll see your product details, including registration date, payment method, recurring amount, billing cycle, options to manage and more.

Step 10 – Explore the interface
Our Fantastic interface.
We offer one-click logins to your cPanel, WHM, Emails, File Manager and phpMyAdmin. You have the option to install WordPress via WordPress Manager or Softaculous. In this section, you can also manage your Addon domains, Subdomains, Cron jobs, Backups, Email accounts and more!

Now you know how to make a reseller account with Brixly. Congratulations!
Check out our reseller hosting plans!


