This is the anticipated article on the integration of WHMCS. If you want to know more about WHMCS, look at the first article, explaining what WHMCS is and its benefits. If you are an existing reseller or are considering our Reseller Hosting check out our WHMCS license page to grab your discounted license today!
Integration with WHMCS
WHMCS is the complete all-in-one tool for web hosting providers to help manage and automate your hosting business. WHMCS makes it easy to automate the billing management system, generate automated invoices, send payment reminders, and more.
WHMCS integration involves creating a WHMCS client area template that matches the header and footer areas of your main website design, ensuring that both your main website and your WHMCS installation have a visually consistent layout.
It is imperative for your business to ensure that your theme is integrated with WHMCS. Choosing a WHMCS-compatible theme will help you invest your precious time in expanding your web hosting business rather than manually doing everything mentioned above.
Getting Started
Remember that a license is required before the integration process. You can purchase your license directly from WHMCS, but we recommend that you purchase a license from a WHMCS-approved web hosting provider, like us. We are proud partners of WHMCS, and as Brixly Reseller, all licenses can be purchased from us at a discounted rate. We’re even cheaper than WHMCS themselves! Don’t believe me? Check out the price comparison between WHMCS and Brixly.
Price Comparison Table
WHMCS’s Pricing Table
| License type | Number of Clients | Price per license |
| Plus (Unbranded) | Up to 250 | £17.09 ($18.95) |
| Professional | Up to 500 | £27.01 ($29.95) |
| Business | Up to 1000 | £40.54 ($44.95) |
*Note that the prices in GBP (£) were accurate at the time of conversion.
Brixly’s WHMCS Pricing Table
| License type | Number of Clients | Price per license |
| Starter (Branded) | Up to 250 | £6.95 |
| Plus (Unbranded) | Up to 250 | £9.95 |
| Professional | Up to 500 | £19.95 |
| Business | Up to 1000 | £29.95 |
Only available with an active Brixly reseller plan. A free WHMCS Starter licence is included with our Premium Reseller plan.
Check out our WHMCS license page.
How do I Integrate my WHMCS?
WHMCS offers an installation & configuration service priced at £22.51 ($24.95), and their integration service is priced at £31.52 ($34.95). So, by paying for their services, you would get installation, configuration and Integration for £54.03 ($59.90). Your business will pretty much be all set after that.
However, at Brixly, we have simplified the installation process which can be done in just minutes using the Softaculous installer.
Helpful links
Installing WHMCS using Softaculous.
WHM, cPanel, DirectAdmin and WHMCS Explained
Follow the steps below to integrate the platforms yourself manually.
Step 1 – WHMCS License
First, you must obtain a WHMCS license from Brixly or the official WHMCS website. To purchase a license from us, you need to log into your client area, where you’ll find the option to buy a license. You can select a plan based on the number of clients you expect, and you can always upgrade/downgrade at any time. A license can also be purchased simultaneously when purchasing your reseller hosting plan (Included free with our Premium Reseller hosting). Once your purchase has gone through, your license will be emailed to you.
Visit our WHMCS license web page to look at our pricing.
Step 2 – Installing WHMCS
The easiest method to install WHMCS is to install it via Softaculous. This can be installed into an account within your Reseller Hosting plan, however, your licence allows you to install WHMCS on any server (many clients opt to install their WHMCS into a separate Premium Hosting plan to keep the installation separate from the server where their clients are hosted).
We would always recommend installing WHMCS to its own subdomain or subdirectory of your brands’ main website. For example, ours is on ‘client.brixly.uk’.
We would always encourage using something like ‘secure.’, or ‘client.’ as opposed to ‘whmcs.’ to be more generic – it also makes it far more memorable for your clients!
Step 3 – Accessing your account
Log in to your administrative interface for WHMCS. This can be done by going to the directory where your WHMCS installation is installed. For example, https://yourdomain.com/client/admin. When on the admin login area, enter your login details.
If you installed your WHMCS via Softaculous, then these details would have been provided at the end of the installation process.
Step 3 – Setting up Servers
Once logged in, you need to set up your first ‘Server’. As a Brixly Reseller, this step will be to add the server associated with your Reseller Hosting to WHMCS. Follow the steps below…
- Log in to your WHMCS account
- Find the ‘Setup’ section
- Click on Products/Services and then click on Servers
- You will then need to add a new server
- Information required for this step ‘Name, Hostname, IP Address, Type and WHM username & password
- After supplying the required information, you need to test the connection.
- If it connects with no issues, save changes. If not, verify the information provided to ensure it is correct.
If you are a Brixly Reseller, then all of the details above would have been sent in your welcome email, under the section ‘WHMCS’.
Step 4 – Create a product group
Now that you have your Server added, it’s time to create a new Product Group.
Product groups organize products and product bundles on your order form. Each group has a separate page, and you can group products in categories or across several pages. For example, you may wish to list your shared hosting plans separately from reseller plans.
Product groups list similar or related products together, allowing them to display side-by-side for comparison in some order form templates. You must create at least one product group before you can create a product.
The operation is extremely simple:
- Go to System Settings and choose Servers. You will see the option Create New Group.
- Enter a Name for your group.
- Select the name of the server you just created and click Add.
- Hit the Save Changes button.
Step 5 – Create a product
We are now on the last step of your setup – it’s time to create your product! Here is how to do that:
- Go to System Settings, choose Products/Services, and select the Create a New Product option.
- Select Your chosen hosting option from the Product Type field.
- Now, choose the created product group from the Product Group menu.
- Input the Product Name you wish to use for this product.
- Select Your chosen module from the Module selection field.
If you are creating a web hosting product from our reseller hosting, then choose ‘Web Hosting’ as the product type, and choose ‘cPanel’ as the module.
Step 6 – Configuration
You can now begin configuring and customising your WHMCS installation. This includes setting up additional products, packages, domain pricing, adding TLDs, contact departments, adding modules, and setting up the panel’s design on your website. Below are some of the basic options you should consider configuring.
- Click Setup>>>General Settings to configure general settings.
- Click Setup>>>Payment Gateways to setup Gateway for your business
- Add your servers by clicking Setup>>>Product/Services>Servers
- Navigate to Setup>>>Product/Services to configure the services you will offer.
- Click Setup>>>Products/Services>Server
- Navigate to configuration>>>System Settings>>>Domain Pricing
- Navigate to Setup>>>Support Departments for support ticket departments
- Email piping, which imports all emails into the support ticket system.
- Navigate to Setup>>>Automation Settings for WHMCS Cron Job setup
- To see your Cron job status, Setup>Automation Status.
- Finally, let’s test to see if all that was configured works. Create test orders, check if the system creates an invoice, and collect payment.
Once you have gone through the steps above, you can integrate WHMCS into your main website or use it as a stand-alone interface for users to purchase domains and hosting services from your company.
How to Integrate WHMCS with my Website (WordPress)
WHMCS can be used as a standalone product for your clients, to provide a full client area/management interface for their hosting services. However, it’s generally recommended to build your own ‘marketing’ site through whatever tools you prefer (such as WordPress or any site builder), then integrate with WHMCS so the two work natively together.
For example, we have our main website on brixly.uk, whilst our WHMCS is installed on client.brixly.uk
This ensures we have complete freedom and flexibility, which gives us an advantage from an SEO perspective, and a creativity perspective.
We personally choose to keep the client area and the main website cosmetically ‘different’, however, there are tools (such as WHMCS Bridge) that allow you to tighten the integration between WHMCS and WordPress, making the two interfaces feel seamless and consistent.
Integrate your website using Lagom

At Brixly we highly recommend you integrate your website using Lagom. Throughout the years we’ve been in business, we have encounter countless ways of integrating your WordPress website with WHMCS and we believe Lagom is a Perfect Solution for your WHMCS Business. Purchase the Client theme here.
How to install Lagom WHMCS Client Theme
We will walk you through the steps necessary to install the Lagom WHMCS Client Theme on you platform. Follow this guide carefully to guide you through the whole installation process.
Downloading Files
Step 1
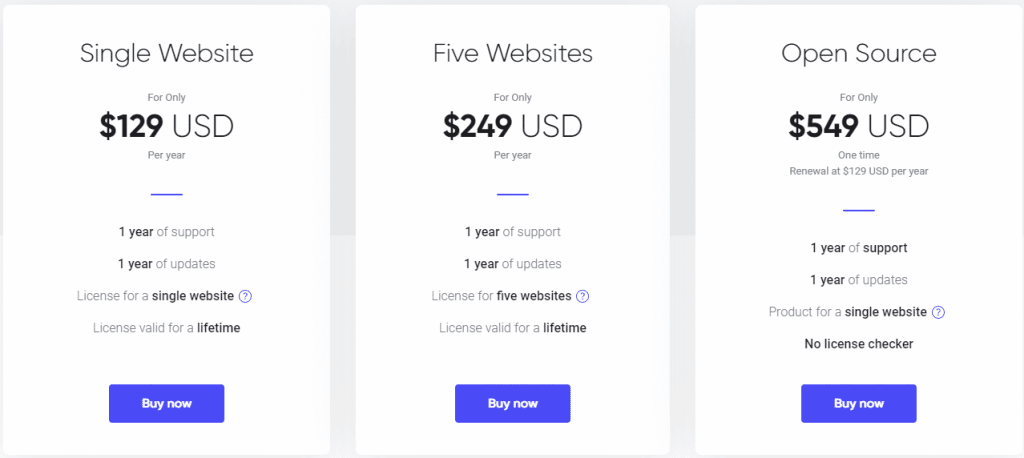
You would need to create an account and purchase the Client theme, check out the pricing below.
Pricing
Step 2
After purchasing your license, log in to the RS Studio Client Portal and Navigate to My services.
Step 3
Choose the theme you would like to install and then click the “Manage” button.
Step 4
When in the “Manage” area, you need to then download the file by clicking the “Download” button on the main product page. The downloaded file will be in a zip. format.
Uploading Files
Step 1
Log in to your FTP Client or use the File manager in your cPanel.
Step 2
Extract the zip. file folder that has been downloaded
Step 3
Go to the directory where your WHMCS is installed, upload the /php71+/ folder using FTP server. Ensure the upload process of all files is done without any errors.
Step 4
Once the Lagom files have been uploaded correctly to your WHMCS directory. Ensure that the files and folders are located in /templates/lagom2/core/styles/ and the they have write privileges.
Activate Module in WHMCS
Log in to the WHMCS admin area.
In the top right corner, go to the tool icon, click on “System Settings” and then look for “Addon Modules”.
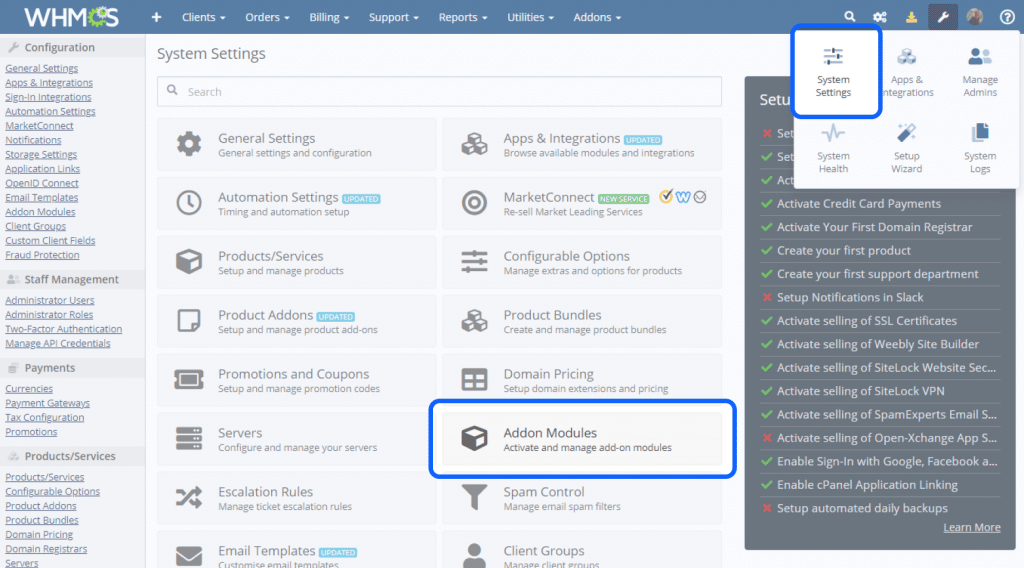
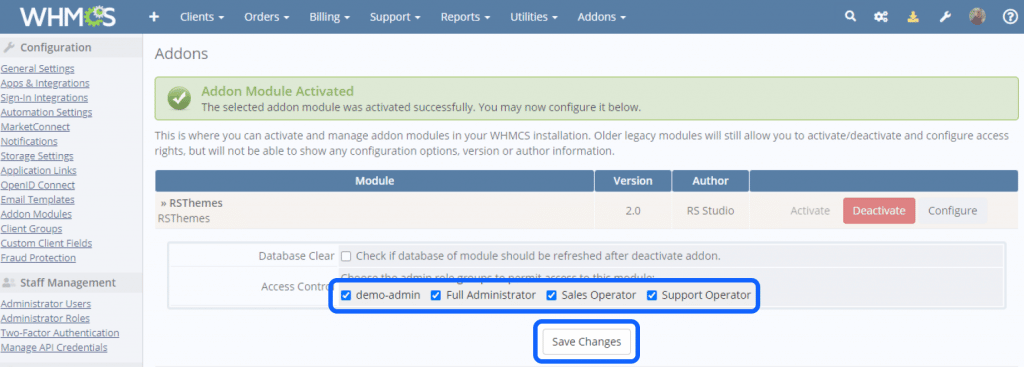
Once in “Addon Modules”. Activate the “RS Themes” addon.

Click on the “Configure” button and select admin role groups to grant access according to your requirements, then click on save changes.
Activate Lagom Theme
- Go to “Addons” and then click on “RS Themes” in the top bar navigation menu of your WHMCS admin area.

- Click the “Manage” button located next to the previously installed product.

- Enter a product license key and press the “Save” button. Your product license key can be found in RS Studio Client Portal.

- Click the “Activate Theme” button to activate the Lagom theme for the “client area” and the “ordering process”.

Thats it! To Purchase The Lagom Client Theme Click Here.
Integration using WHMCS Bridge Plugin

The WHMCS bridge is a plugin that integrates your WHMCS support and billing software into WordPress, providing your customers with a seamless and consistent user experience. With the theme inheritance feature, styling your WHMCS installation won’t be necessary anymore. The integration ensures that your WHMCS installation looks and feels like your WordPress site!
WHMCS can be added to WordPress easily using the WHMCS bridge plugin. You can get a free version of the plugin or a premium version (Pro). The plugin developers, i-Plugins, offer a 45-day free trial for the Premium (Pro) version so that you can experience the premium (Pro) version beforehand. In the free version, you can still bridge WHMCS to WordPress, but for more advanced features like single sign-on, multi-lingual WHMCS support and support for WHMCS market connect, you would need the premium version (Pro).
Installing WHMCS Bridge
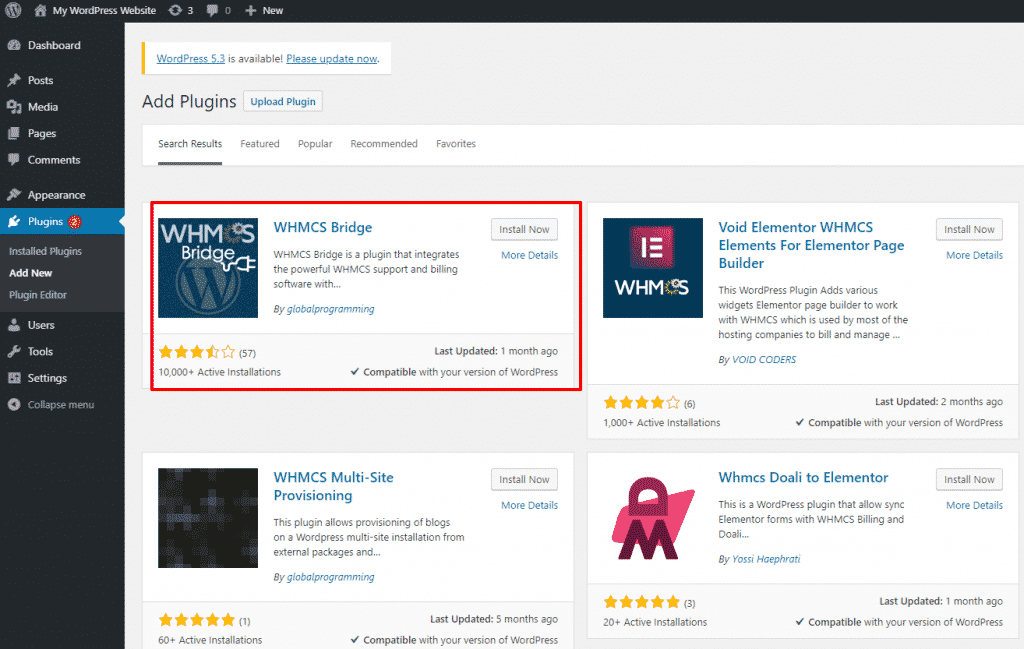
Login to your WordPress dashboard> Go into plugins > Click on ‘Add New Plugin’> Search for ‘WHMCS Bridge’> install the WHMCS bridge plugin and activate it in your WordPress.
After the plugin installation, go to the WHMCS bridge plugin settings. You must add your WHMCS account URL (the link to your installation) and click save settings.
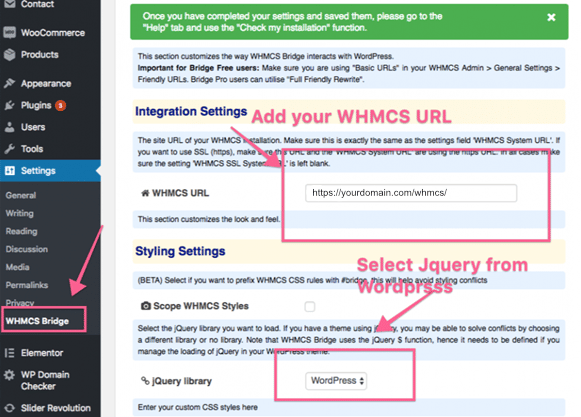
Once the link is added, you can change your jQuery to WordPress or WHMCS.

In most cases, you should select template ‘six’. However, if you have a custom template, you would have to upload it via your FTP client, e.g. FileZilla or cPanel file manager, to select it. After choosing a template, click save.
After installation, WHMCS bridge will create a custom page with the slug ‘WHMCS-bridge’. Please do not remove the page, but you can rename it.
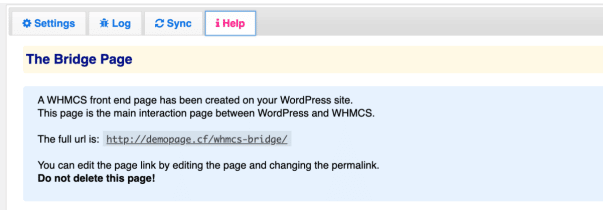
After your WHMCS account is synced to WordPress, click the ‘Help’ tab at the top of the settings page. Here you will get the WHMC bridge page which your user will see. Click the link to have a look at the page. The URL of the page is customisable.
Remember that your WHMCS installation and your WordPress installation are separate installations, so you would have to sign into both platforms individually without this plugin. This is where WHMCS Bridge Pro comes in. If you get the WHMCS Bridge Pro version, you get several additional features, with the main feature being the single sign-on (SSO) capability. With the single sign-on feature, your clients only have to sign in once. Enabling them to engage with your content, order hosting and pay their invoices easily.
With WHMCS Bridge integration, a WHMCS client area template is created that matches the header and footer sections of your main website design. It ensures the layout consistency of your main website and your WHMCS installation. WHMCS bridge is free, but to get all the features mentioned, you must purchase the WHMCS bridge pro version after the 45-day trial. This will set you back around £17.97 ($19.95) every three months, which works out to about £5.99 ($6.65) a month.
Other Features
Features only found in the WHMCS Bridge Pro version.
Single sign-on – clients only need to sign in once, either on WHMCS or WordPress, to use both platforms without having to log in to both platforms separately.
Multilingual WHMCS Support – WHMCS is fully integrated with qtranslate and WPML. With qtranslate, you can convert text/words on your website to any language. The WordPress Multilingual plugin (WPML) easily allows you to set up and manage your products in multiple currencies.
Pretty permalinks – instead of https://www.youdomain.com/?ccce=clientarea your domain will be displayed like this https://www.yourdomain.com/clientarea.
Shortcodes – You can use WordPress shortcodes to display WHMCS pages.
Custom templates – You can use any responsive template.
Caching – This helps speed up loading time and reduce resource usage.
IP address resolution ‘patch’ – Logs your client’s IP address instead of your server’s IP address upon registration.
Integration code
WHMCS allows you to create many useful links, including login or product links for the Client Area, shortcuts to ticket submission forms, or order form purchase links.
Integrating The Login Form
Go to Utilities > Integration Code in the WHMCS Admin Area for copy-and-paste ready code for adding a client’s login form to any page of your site.
In WHMCS version 8.0 and above, enhanced security around login forms means that to leverage an external login form that posts data to dologin.php, the line below must be added to the configuration.php file:
$allow_external_login_forms = true;
Integrating The Registration form
Go to Utilities > Integration Code Copy and paste the code under User Registration into your website to display a registration link.
Integrating The Domain Availability Check
Go to Utilities > Integration Code within the WHMCS Admin Area for copy-and-paste ready code for adding a domain lookup form to any page of your site.
Integrating Domain Ordering
Go to Utilities > Integration Code Copy and paste the code under Domain Ordering into your website to display a form allowing your customer to enter a domain name and add it to their shopping cart.
Conclusion
WHMCS can, without a doubt, help you manage and simplify your business. Integrating your website to WHMCS will not only open new doors for your business, but it will ensure trust amongst your clients by enhancing visual integration by bridging cross-domain messaging for a smoother visual integration. A client area process that matches your website’s design is vital as it increases the confidence of your customers. If you are thinking of entering the reseller hosting market or are already a part of it, you should consider WHMCS. We offer a Free WHMCS license with every Premium Reseller plan.


